产生的文件名为core-命令名-pid-时间戳 以下是参数列表: %p - insert pid intofilename 添加pid %u - insert current uid intofilename 添加当前uid %g - insert current gid intofilename 添加当前gid %s - insert signal that caused the coredump into the filename 添加导致产生core的信号 %t - insert UNIX time that the coredump occurred intofilename 添加core文件生成时的unix时间 %h - insert hostname where the coredump happened intofilename 添加主机名 %e - insert coredumping executable name intofilename 添加命令名
$ gdb ./app core-app-20132-1733721582 GNU gdb (Ubuntu 12.1-0ubuntu1~22.04.2) 12.1 Copyright (C) 2022 Free Software Foundation, Inc. License GPLv3+: GNU GPL version 3 or later <http://gnu.org/licenses/gpl.html> This is free software: you are free to change and redistribute it. There is NO WARRANTY, to the extent permitted by law. Type "show copying" and "show warranty"for details. This GDB was configured as "x86_64-linux-gnu". Type "show configuration"for configuration details. For bug reporting instructions, please see: <https://www.gnu.org/software/gdb/bugs/>. Find the GDB manual and other documentation resources online at: <http://www.gnu.org/software/gdb/documentation/>.
For help, type"help". Type "apropos word" to search for commands related to "word"... Reading symbols from ./app... [New LWP 20132] [Thread debugging using libthread_db enabled] Using host libthread_db library "/lib/x86_64-linux-gnu/libthread_db.so.1". --Type <RET> for more, q to quit, c to continue without paging--c Core was generated by `./app'. Program terminated with signal SIGSEGV, Segmentation fault. #0 0x000055902ca68139 in func (p=0x0) at main.c:5 5 *p = 0;
$ gdb ./app core-app-34711-1733723593 GNU gdb (Ubuntu 12.1-0ubuntu1~22.04.2) 12.1 Copyright (C) 2022 Free Software Foundation, Inc. License GPLv3+: GNU GPL version 3 or later <http://gnu.org/licenses/gpl.html> This is free software: you are free to change and redistribute it. There is NO WARRANTY, to the extent permitted by law. Type "show copying" and "show warranty"for details. This GDB was configured as "x86_64-linux-gnu". Type "show configuration"for configuration details. For bug reporting instructions, please see: <https://www.gnu.org/software/gdb/bugs/>. Find the GDB manual and other documentation resources online at: <http://www.gnu.org/software/gdb/documentation/>.
For help, type"help". Type "apropos word" to search for commands related to "word"... Reading symbols from ./app... [New LWP 34711] [Thread debugging using libthread_db enabled] Using host libthread_db library "/lib/x86_64-linux-gnu/libthread_db.so.1". Core was generated by `./app'. Program terminated with signal SIGABRT, Aborted. #0 __pthread_kill_implementation (no_tid=0, signo=6, threadid=139759220007872) at ./nptl/pthread_kill.c:44 44 ./nptl/pthread_kill.c: No such file or directory.
(gdb) bt #0 __pthread_kill_implementation (no_tid=0, signo=6, threadid=139759220007872) at ./nptl/pthread_kill.c:44 #1 __pthread_kill_internal (signo=6, threadid=139759220007872) at ./nptl/pthread_kill.c:78 #2 __GI___pthread_kill (threadid=139759220007872, signo=signo@entry=6) at ./nptl/pthread_kill.c:89 #3 0x00007f1c3abe4476 in __GI_raise (sig=sig@entry=6) at ../sysdeps/posix/raise.c:26 #4 0x00007f1c3abca7f3 in __GI_abort () at ./stdlib/abort.c:79 #5 0x00007f1c3ac2b676 in __libc_message (action=action@entry=do_abort, fmt=fmt@entry=0x7f1c3ad7db77 "%s\n") at ../sysdeps/posix/libc_fatal.c:155 #6 0x00007f1c3ac42cfc in malloc_printerr ( str=str@entry=0x7f1c3ad7b744 "free(): invalid pointer") at ./malloc/malloc.c:5664 #7 0x00007f1c3ac44a44 in _int_free (av=<optimized out>, p=<optimized out>, have_lock=0) at ./malloc/malloc.c:4439 #8 0x00007f1c3ac47453 in __GI___libc_free (mem=<optimized out>) at ./malloc/malloc.c:3391 #9 0x0000559355e2f2ab in dumpTest::test (this=0x7ffd2b1ddd50) at main.cpp:31 #10 0x0000559355e2f2e1 in main () at main.cpp:37
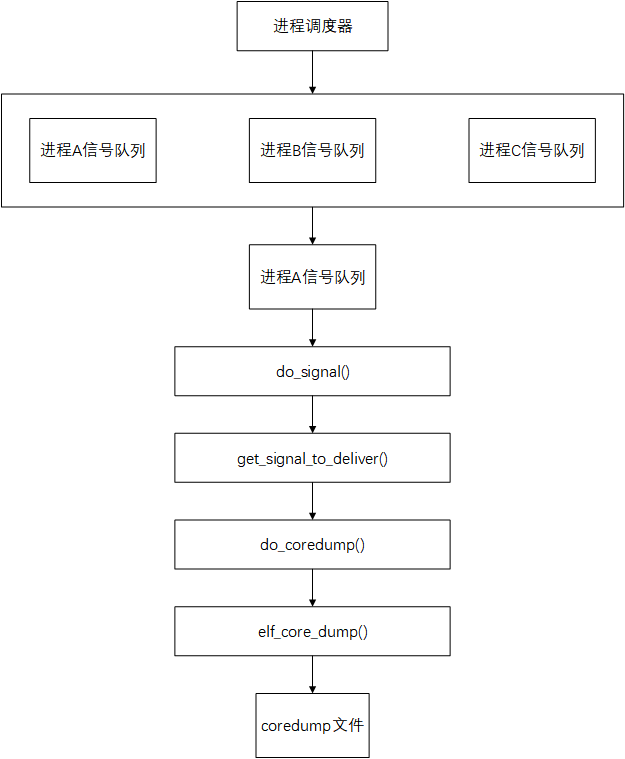
从堆栈信息可以看到,除了最后两帧,其他的都是libc的代码。
进入到第9帧,并查看堆栈寄存器信息:
1 2 3 4 5 6 7 8 9
(gdb) info f Stack level 9, frame at 0x7fff871b7060: rip = 0x563d0c5df2ab in dumpTest::test (main.cpp:32); saved rip = 0x563d0c5df2e1 called by frame at 0x7fff871b7090, caller of frame at 0x7fff871b7040 source language c++. Arglist at 0x7fff871b7050, args: this=0x7fff871b7060 Locals at 0x7fff871b7050, Previous frame's sp is 0x7fff871b7060 Saved registers: rbp at 0x7fff871b7050, rip at 0x7fff871b7058
gdb ./app core-app-178100-1733743589 GNU gdb (Ubuntu 12.1-0ubuntu1~22.04.2) 12.1 Copyright (C) 2022 Free Software Foundation, Inc. License GPLv3+: GNU GPL version 3 or later <http://gnu.org/licenses/gpl.html> This is free software: you are free to change and redistribute it. There is NO WARRANTY, to the extent permitted by law. Type "show copying" and "show warranty"for details. This GDB was configured as "x86_64-linux-gnu". Type "show configuration"for configuration details. For bug reporting instructions, please see: <https://www.gnu.org/software/gdb/bugs/>. Find the GDB manual and other documentation resources online at: <http://www.gnu.org/software/gdb/documentation/>.
For help, type"help". Type "apropos word" to search for commands related to "word"... Reading symbols from ./app... [New LWP 178101] [New LWP 178102] [New LWP 178103] [New LWP 178100] [New LWP 178104] [New LWP 178105] [Thread debugging using libthread_db enabled] Using host libthread_db library "/lib/x86_64-linux-gnu/libthread_db.so.1". --Type <RET> for more, q to quit, c to continue without paging--c Core was generated by `./app'. Program terminated with signal SIGSEGV, Segmentation fault. #0 0x00007f7001fb4449 in arena_for_chunk (ptr=0x55f147223001 <_IO_stdin_used+1>) at ./malloc/arena.c:156 156 ./malloc/arena.c: No such file or directory. [Current thread is 1 (Thread 0x7f7001e03640 (LWP 178101))]
可以看到5个线程的LWP信息。
接着使用 info threads查看所有线程正在运行的指令信息:
1 2 3 4 5 6 7 8 9 10 11 12 13 14 15
(gdb) info threads Id Target Id Frame * 1 Thread 0x7f7001e03640 (LWP 178101) 0x00007f7001fb4449 in arena_for_chunk ( ptr=0x55f147223001 <_IO_stdin_used+1>) at ./malloc/arena.c:156 2 Thread 0x7f7001602640 (LWP 178102) __GI___lll_lock_wake_private ( futex=0x7f700212ba70 <_IO_stdfile_1_lock>) at ./nptl/lowlevellock.c:57 3 Thread 0x7f7000e01640 (LWP 178103) futex_wait (private=0, expected=2, futex_word=0x7f700212ba70 <_IO_stdfile_1_lock>) at ../sysdeps/nptl/futex-internal.h:146 4 Thread 0x7f7001e073c0 (LWP 178100) __futex_abstimed_wait_common64 (private=128, cancel=true, abstime=0x0, op=265, expected=178101, futex_word=0x7f7001e03910) at ./nptl/futex-internal.c:57 5 Thread 0x7f7000600640 (LWP 178104) 0x00007f700202da7b in munmap () at ../sysdeps/unix/syscall-template.S:117 6 Thread 0x7f6fffdff640 (LWP 178105) futex_wait (private=0, expected=2, futex_word=0x7f700212ba70 <_IO_stdfile_1_lock>) at ../sysdeps/nptl/futex-internal.h:146
Thread 6 (Thread 0x7f6fffdff640 (LWP 178105)): #0 futex_wait (private=0, expected=2, futex_word=0x7f700212ba70 <_IO_stdfile_1_lock>) at ../sysdeps/nptl/futex-internal.h:146 #1 __GI___lll_lock_wait_private (futex=0x7f700212ba70 <_IO_stdfile_1_lock>) at ./nptl/lowlevellock.c:34 #2 0x00007f7001f8f095 in __GI__IO_fwrite (buf=0x55f147223008, size=1, count=8, fp=0x7f700212a780 <_IO_2_1_stdout_>) at ./libio/iofwrite.c:37 #3 0x00007f7002274b65 in std::basic_ostream<char, std::char_traits<char> >& std::__ostream_insert<char, std::char_traits<char> >(std::basic_ostream<char, std::char_traits<char> >&, char const*, long) () from /lib/x86_64-linux-gnu/libstdc++.so.6 #4 0x00007f7002274ebb in std::basic_ostream<char, std::char_traits<char> >& std::operator<< <std::char_traits<char> >(std::basic_ostream<char, std::char_traits<char> >&, char const*) () from /lib/x86_64-linux-gnu/libstdc++.so.6 #5 0x000055f14722229c in say_hello (args=0x0) at main.cpp:13 #6 0x00007f7001fa3ac3 in start_thread (arg=<optimized out>) at ./nptl/pthread_create.c:442 #7 0x00007f7002035850 in clone3 () at ../sysdeps/unix/sysv/linux/x86_64/clone3.S:81
Thread 5 (Thread 0x7f7000600640 (LWP 178104)): #0 0x00007f700202da7b in munmap () at ../sysdeps/unix/syscall-template.S:117 #1 0x00007f7001fb0cc5 in alloc_new_heap (size=135168, size@entry=2904, top_pad=top_pad@entry=131072, pagesize=pagesize@entry=4096, mmap_flags=mmap_flags@entry=16384) at ./malloc/arena.c:528 #2 0x00007f7001fb116c in new_heap (top_pad=131072, size=2904) at ./malloc/arena.c:576 --Type <RET> for more, q to quit, c to continue without paging--c #3 _int_new_arena (size=640) at ./malloc/arena.c:744 #4 arena_get2 (size=size@entry=640, avoid_arena=avoid_arena@entry=0x0) at ./malloc/arena.c:963 #5 0x00007f7001fb3a41 in arena_get2 (avoid_arena=0x0, size=640) at ./malloc/arena.c:931 #6 tcache_init () at ./malloc/malloc.c:3244 #7 0x00007f7001fb44cf in tcache_init () at ./malloc/malloc.c:3241 #8 __GI___libc_free (mem=0x55f147223011) at ./malloc/malloc.c:3385 #9 0x000055f1472222da in say_hello (args=0x0) at main.cpp:17 #10 0x00007f7001fa3ac3 in start_thread (arg=<optimized out>) at ./nptl/pthread_create.c:442 #11 0x00007f7002035850 in clone3 () at ../sysdeps/unix/sysv/linux/x86_64/clone3.S:81
Thread 4 (Thread 0x7f7001e073c0 (LWP 178100)): #0 __futex_abstimed_wait_common64 (private=128, cancel=true, abstime=0x0, op=265, expected=178101, futex_word=0x7f7001e03910) at ./nptl/futex-internal.c:57 #1 __futex_abstimed_wait_common (cancel=true, private=128, abstime=0x0, clockid=0, expected=178101, futex_word=0x7f7001e03910) at ./nptl/futex-internal.c:87 #2 __GI___futex_abstimed_wait_cancelable64 (futex_word=futex_word@entry=0x7f7001e03910, expected=178101, clockid=clockid@entry=0, abstime=abstime@entry=0x0, private=private@entry=128) at ./nptl/futex-internal.c:139 #3 0x00007f7001fa5624 in __pthread_clockjoin_ex (threadid=140119044535872, thread_return=0x0, clockid=0, abstime=0x0, block=<optimized out>) at ./nptl/pthread_join_common.c:105 #4 0x000055f1472223b3 in main () at main.cpp:38
Thread 3 (Thread 0x7f7000e01640 (LWP 178103)): #0 futex_wait (private=0, expected=2, futex_word=0x7f700212ba70 <_IO_stdfile_1_lock>) at ../sysdeps/nptl/futex-internal.h:146 #1 __GI___lll_lock_wait_private (futex=0x7f700212ba70 <_IO_stdfile_1_lock>) at ./nptl/lowlevellock.c:34 #2 0x00007f7001f96f05 in __GI__IO_putc (c=10, fp=0x7f700212a780 <_IO_2_1_stdout_>) at ./libio/putc.c:30 #3 0x00007f700227426a in std::ostream::put(char) () from /lib/x86_64-linux-gnu/libstdc++.so.6 #4 0x00007f7002274813 in std::basic_ostream<char, std::char_traits<char> >& std::endl<char, std::char_traits<char> >(std::basic_ostream<char, std::char_traits<char> >&) () from /lib/x86_64-linux-gnu/libstdc++.so.6 #5 0x000055f1472222ae in say_hello (args=0x0) at main.cpp:13 #6 0x00007f7001fa3ac3 in start_thread (arg=<optimized out>) at ./nptl/pthread_create.c:442 #7 0x00007f7002035850 in clone3 () at ../sysdeps/unix/sysv/linux/x86_64/clone3.S:81
Thread 2 (Thread 0x7f7001602640 (LWP 178102)): #0 __GI___lll_lock_wake_private (futex=0x7f700212ba70 <_IO_stdfile_1_lock>) at ./nptl/lowlevellock.c:57 #1 0x00007f7001f8f06d in _IO_acquire_lock_fct (p=<synthetic pointer>) at ./libio/libioP.h:884 #2 __GI__IO_fwrite (buf=<optimized out>, size=1, count=8, fp=0x7f700212a780 <_IO_2_1_stdout_>) at ./libio/iofwrite.c:37 #3 0x00007f7002274b65 in std::basic_ostream<char, std::char_traits<char> >& std::__ostream_insert<char, std::char_traits<char> >(std::basic_ostream<char, std::char_traits<char> >&, char const*, long) () from /lib/x86_64-linux-gnu/libstdc++.so.6 #4 0x00007f7002274ebb in std::basic_ostream<char, std::char_traits<char> >& std::operator<< <std::char_traits<char> >(std::basic_ostream<char, std::char_traits<char> >&, char const*) () from /lib/x86_64-linux-gnu/libstdc++.so.6 #5 0x000055f14722229c in say_hello (args=0x0) at main.cpp:13 #6 0x00007f7001fa3ac3 in start_thread (arg=<optimized out>) at ./nptl/pthread_create.c:442 #7 0x00007f7002035850 in clone3 () at ../sysdeps/unix/sysv/linux/x86_64/clone3.S:81
Thread 1 (Thread 0x7f7001e03640 (LWP 178101)): #0 0x00007f7001fb4449 in arena_for_chunk (ptr=0x55f147223001 <_IO_stdin_used+1>) at ./malloc/arena.c:156 #1 arena_for_chunk (ptr=0x55f147223001 <_IO_stdin_used+1>) at ./malloc/arena.c:160 #2 __GI___libc_free (mem=<optimized out>) at ./malloc/malloc.c:3390 #3 0x000055f1472222da in say_hello (args=0x0) at main.cpp:17 #4 0x00007f7001fa3ac3 in start_thread (arg=<optimized out>) at ./nptl/pthread_create.c:442 #5 0x00007f7002035850 in clone3 () at ../sysdeps/unix/sysv/linux/x86_64/clone3.S:81
查看指定线程堆栈信息 thread apply 4 bt:
1 2 3 4 5 6 7 8
(gdb) thread apply 4 bt

Thread 4 (Thread 0x7f7001e073c0 (LWP 178100)):
#0  __futex_abstimed_wait_common64 (private=128, cancel=true, abstime=0x0, op=265, expected=178101, futex_word=0x7f7001e03910) at ./nptl/futex-internal.c:57
#1  __futex_abstimed_wait_common (cancel=true, private=128, abstime=0x0, clockid=0, expected=178101, futex_word=0x7f7001e03910) at ./nptl/futex-internal.c:87
#2  __GI___futex_abstimed_wait_cancelable64 (futex_word=futex_word@entry=0x7f7001e03910, expected=178101, clockid=clockid@entry=0, abstime=abstime@entry=0x0, private=private@entry=128) at ./nptl/futex-internal.c:139
#3  0x00007f7001fa5624 in __pthread_clockjoin_ex (threadid=140119044535872, thread_return=0x0, clockid=0, abstime=0x0, block=<optimized out>) at ./nptl/pthread_join_common.c:105
#4  0x000055f1472223b3 in main () at main.cpp:38
(gdb) thread 4
[Switching to thread 4 (Thread 0x7f7001e073c0 (LWP 178100))]
#0  __futex_abstimed_wait_common64 (private=128, cancel=true, abstime=0x0, op=265,
    expected=178101, futex_word=0x7f7001e03910) at ./nptl/futex-internal.c:57
57      ./nptl/futex-internal.c: No such file or directory.


(gdb) bt
#0  __futex_abstimed_wait_common64 (private=128, cancel=true, abstime=0x0, op=265,
    expected=178101, futex_word=0x7f7001e03910) at ./nptl/futex-internal.c:57
#1  __futex_abstimed_wait_common (cancel=true, private=128, abstime=0x0, clockid=0,
    expected=178101, futex_word=0x7f7001e03910) at ./nptl/futex-internal.c:87
#2  __GI___futex_abstimed_wait_cancelable64 (futex_word=futex_word@entry=0x7f7001e03910,
    expected=178101, clockid=clockid@entry=0, abstime=abstime@entry=0x0,
    private=private@entry=128) at ./nptl/futex-internal.c:139
#3  0x00007f7001fa5624 in __pthread_clockjoin_ex (threadid=140119044535872, thread_return=0x0,
    clockid=0, abstime=0x0, block=<optimized out>) at ./nptl/pthread_join_common.c:105
#4  0x000055f1472223b3 in main () at main.cpp:38


(gdb) i f
Stack level 0, frame at 0x7ffebda6cb90:
 rip = 0x7f7001fa0117 in __futex_abstimed_wait_common64 (./nptl/futex-internal.c:57);
    saved rip = 0x7f7001fa5624
 inlined into frame 1
 source language c.
 Arglist at unknown address.
 Locals at unknown address, Previous frame's sp in rsp